Tagging a Cover Bird with Gold — My Second Gold Tooling Experience
tutorial, bookbinding, book binding, instructional, gold tooling, gold 0 Comment
Yesterday was the second gold tooling class I’m taking. Once again, we’ve been practicing lines on dummy books. However, our teacher reserved some fun for the end of the workshop.
I’m not an expert, but gold tooling seems to be one of the most expensive processes for a bookbinder. To make a simple book, you need almost nothing besides paper. If you want to work with leather, you can always find some cheap options. That would be not the best bookbinding leather, but it would do. You can make almost all tools you need yourself or use some substitutes. However, if you want to practice gold tooling, you’ll need tools (lots of them) and gold. OK, you can use foil — that would be much cheaper. But you will need the tools anyway.
During the past years when a client wanted some ornament or text stamped on a book, I’ve ordered magnesium cliché plates. Using them is not the most convenient thing if you try to save money and do not have proper equipment. But that was OK.
Things change. I’ve started to check the prices for the proper tools. Fillets, wheels, type holders. It is still mostly out of my budget, but I have already ordered some cheaper things on eBay and I’m ready to start my collection.
The whole experience with gold tooling classes in my studio is amazing. That’s the first time I have a fellow bookbinder teaching at my place and it is a bit strange to be a student in my own workshop. However, I’m learning lots of new things and it gives me an inspiration both for my future bookbinding projects and ideas for new posts at iBookBinding.com
I’ve made wooden dummies before the first workshop a month ago. This time we’ve covered them with leather:


Using Fixor as a priming:


I’ve marked the places where the lines would be tooled with a bone folder.


My first attempt was much messier than the teacher’s example =)


The result:


For the second try we’ve decided to fully cover the ‘back’ with the gold:


Not the best job, but I love the smaller details!


We’ve tried to use some dry priming, but, as it was made with the same egg as last time, it appeared to be useless…


Teacher is doing some magic with his breath on the dry egg priming:


Next we’ve used Fixor on cloth. It stained the cloth, but nobody cared;


Much better, huh?
From left to right: foil, old foil and gold. You can see Fixor around the golden pattern and stitches of the cloth showing through the foil:

Removing excess gold with an eraser:


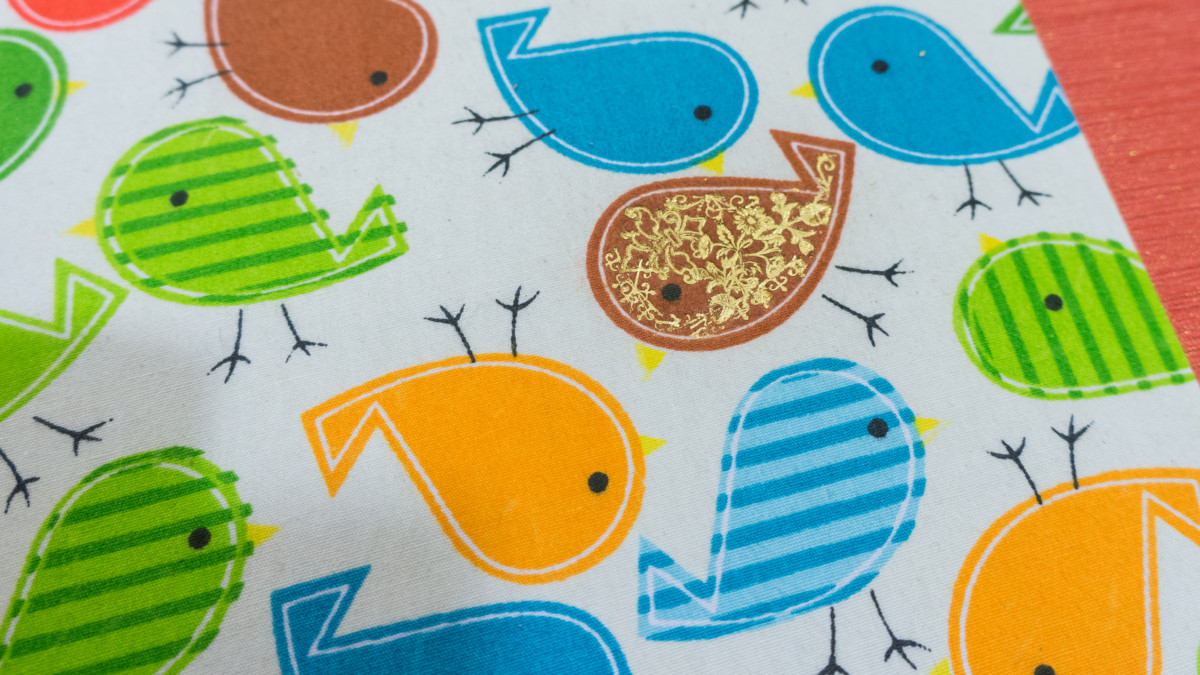
And here are the birds. You can see one of them covered with Fixor:

The tooling process:


As for the title of the post, here is the tagged bird =)

The teacher tooled it while experimenting with gold tooling different cloths. My fellow students and I were working with leather for six hours and after that, in the end of the class, we decided to try some other materials.
The book was lying in my workshop for quite a long time. I made it as an example during a class I taught almost a year ago.
Now I have no choice but to put it to use (or pass it to my wife).
Rare moment when I’m in the picture =)

Bookbinding Supergirl!

Gold was everywhere:
")
")
Even in the food:
")
")
")
Read More
Please Support us on Patreon!
![]() The minimum level of contribution is only $1 per month.
The minimum level of contribution is only $1 per month.
Moreover, starting with the pledge level of $3, you will get a digitized vintage book about bookbinding, book history, or book arts each month from us!
These pledges help iBookBinding to continue its work and bring more information about bookbinding and book arts to you!
