
City & Guilds Course in Bookbinding (for Beginners)
tutorial, bookbinding, book binding, instructional, workshop, City and Guilds 3 Comments
The following instructions form the first part of the City & Guilds Level 1 Unit 118 Course in Bookbinding. Reproduced with the consent of Shepherds Bookbinders who own all rights. A downloadable PDF copy of this course can be found here.
Basic Bookbinding Terms

Here are a few commonly used bookbinding terms. Learning these basic terms and phrases will help you understand the exercises covered later in this post. Along with the principle of ‘Grain Direction’, and ‘Learning about Paper’ a little time spent reading these simple definitions will help you make informed choices when ordering materials and equipment.
NOTE: You might also want to check out our post ‘The Basics of Bookbinding‘ which gives a comprehensive breakdown of all the tools and equipment you’ll likely need for your journey into bookbinding.
Pagination

Single Sheet
1. A page is one side of a leaf of paper. therefore a leaf of paper contains two pages.
Folio
2. A folio is a folded sheet of paper. A piece of paper folded once comprises four pages and two leaves.
Section
3. A group of folded sheets gathered together as either four (as in diagram), six, eight, twelve or sixteen leaves.
Note: It is common practice to refer to sections by the number of pages rather than the number of leaves. i.e. 2pp, 4pp, 8pp, 16pp and so on.
Bookblock

Paper sewn together with thread and reinforced with mull across the spine to prevent the paper tearing at the spine. The sewn bookblock may have coloured or decorative endpapers at each end, these are known as endpapers or endsheets.
Bonefolder

A dull edged tool used to crease or flatten material. Made from the leg bone of a cow, deer, or similar animal (hence its name). Bone folders made of Teflon (see here) have the advantage of not creating shiny marks on paper during use.
Boards

General term for greyboards or millboards which are used to form the foundation for book covers. They are covered with cloth, paper or other material to form the book covers. Boards come in a variety of thicknesses and densities.
Book Cloth

A specially prepared woven cloth that is used for covering book covers. Book cloths have a barrier to prevent glue from penetrating the outside of the material. Some have a paper lining to prevent the penetration of glue, others such as buckram have an acrylic coating. They come in a wide variety of textures and finishes
Case

The cover of a book that consists of two boards, a spine piece and covering material. The case is made separately from the book block and later attached to the text block in a step called casing-in.
Casing-In
Process of applying adhesive to the outermost end-papers of a book-block and attaching it into its case.
Endpapers
The sheets of paper (two or more) which come between the cover and the sewn sections. They are also sometimes referred to as pastedowns.
Squares

The space between the outer edge of the boards or covers of a book and the book-block. Their size is dependent on the size, use and binding style of the book.
Paste
A starch based adhesive. It has a longer open time (i.e. it takes longer to dry) than PVA so allows more time to manipulate surfaces into the correct position.
View our IN-DEPTH GUIDE TO BOOKBINDING GLUES
PVA
Poly Vinyl Acetate. A flexible liquid adhesive that results in a very strong bond. We recommend Reversible PVA which is soluble in water.
PVA/Paste
Binders often use a combination of PVA and Paste. This mixture gives the beginner more time to carry out procedures.
Grain Direction
Most materials have a grain direction and it is important to spend a little time understanding this principle and why it is so important in bookbinding. The general rule is that all materials that make a book, for example paper, cloth, and board, should have their grain running from head to tail in the finished book (1) Failure to observe this rule can cause the book covers to warp when materials with opposing grains are glued together. Books with sewn sections always lie flat, and open better, if the grain of the paper in the book-block is running correctly.
The fibers which make up a piece of paper or board behave in exactly the same way as the diagram on the right. Materials bend more easily along the grain than across it so you can tell the grain direction of a sheet of paper by testing on which side there is greater resistance to bending (3 and below) .
Looked at under a microscope, the fibers of a material such as paper would be seen to lie in parallel lines, rather like logs floating down a river (2). These lines, or direction of flow, indicate the grain direction. Pull the fibers along the grain and they slide along each other. Pull the fibers across the grain and they bunch up, causing the paper to cockle.
Another way to test the grain direction of paper is to drag your finger and thumb along the long edge and the shot edge of a piece of paper. One edge will cockle more than the other (5).


Paper with the grain running along the longer edge is described as ‘long grain’. Paper with the grain running along the shorter edge is called ‘short grain’ (4).
[support-website]Learning About Paper
In the early years of the printing industry all paper was made by hand (An interesting documentary on the history of paper here). Some of the finest pper in the world is still hand-made, but the development of paper making machines has resulted in a wide range of mass produced products. Here are a few basic facts to help you make the right choices when choosing paper for a project.
Weights of Paper
The thickness of any given paper can be measured in a number of ways.The European system is to calculate the number of grams per square metre. A 300gsm paper refers to an entire square metre of that paper weighing 300 grams, whatever a particular sheet size may be. The American system is typically to measure the number of pounds per ream. A ream is 500 sheets. For example; a 140lb watercolour paper indicates that 500 sheets of this paper weighs 140lbs.The terms ‘Cover’ and ‘Text’ refer to the general weight of the paper and its suitability for a specific task. For example, a ‘Cover’ weight ranges from 220 to 350 gsm (from 120lbs) and can be compared to the thickness of a greeting card or the pages of a photograph album. ‘Text’ weight, 80 to160gsm (from 60lbs) refers to a thinner paper used for letter writing, the pages of a notebook or printing paper for books.
Sizes of Paper
Paper sizes have evolved over the centuries in response to the needs of the printing industry. The most common formats are the ‘A sizes’ and ‘B sizes’. Common American sizes are also included in the table below.
Wove and Laid
Sheets are often described as ‘Wove’ or ‘Laid,’ the latter term originating from the traditional practice of making paper on a wire mesh which produces grid lines in the paper. A typical laid sheet has horizontal lines running close together and broader lines, a few centimetres apart, running at right angles to the horizontal lines. In contrast, ‘Wove’ paper has no grid lines or visible surface texture and is generally associated with modern paper.


FIRST EXERCISE – SINGLE SECTION BINDING

Three Stages in Making this Book
- The first stage is to make the ‘bookblock’. In this exercise the book-block is made from six sheets of A4 paper, folded together to form a single set of folded leaves.
- The second stage is to make the outside cover, usually known as ‘the case’.
- The final stage is to glue the bookblock to the case. This process is known as ‘casing-in’.
Stage 1 – Making the bookblock
1. Take six sheets of A4 paper (must be long grain) and one at a time carefully fold each sheet in half as shown below (1 a,b,c). The edges of the paper should meet as closely as possible. With a knife slit each fold just beyond the halfway mark (2); slitting the paper in this way helps to prevent the paper creasing when the paper is folded again. Now fold the sheets in half a second time at 90deg to the first to form six four-leaf sections (3 a,b,c).
2. Slit the paper just over half way along the fold
3. Slit the edge


Note – the edges of the paper will trimmed at a later stage.

When all six sheets have been folded twice, open each four-leaf section at the middle and insert one into another. The result is a single twenty-four-leaf book-block with the grain running from head to tail (4).Take two sheets of short-grain coloured paper not less than 90gsm in weight, big enough to wrap around the bookblock and preferably slightly larger (5). Fold in half, again making sure the grain of the paper is running head to tail. These coloured sheets will form the endpapers and they will be trimmed after sewing. If time allows put the bookblock under a heavy weight to let the paper settle.


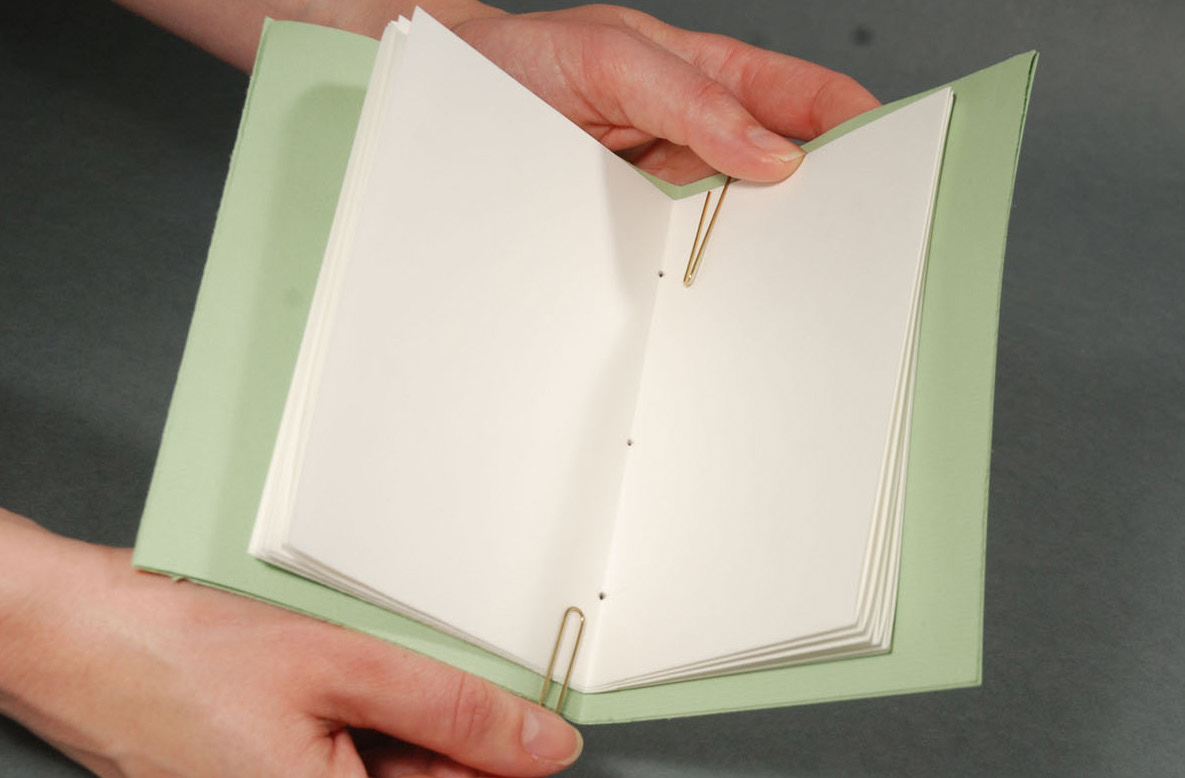
The bookblock is now ready for sewing. Hold the book half open and, using a sharp needle (or bodkin), make one hole at the centre of the fold and two others approximately 50mm (2in) on either side (6). You may find it helpful to hold theendpapers and bookblock together with two paper-clips.


7. To strengthen the sewing structure, cut a piece of mull or calico wide enough to overlap the bookblock by approximately 15mm (5/8in) on each side and slightly shorter than the length of the bookblock. Fold it around the spine.

Keeping the edges of the paper as level as possible, open the bookblock at the middle and use paper-clips at the head and tail of the pages to hold the materials in place. This will assist in keeping the materials in place during the sewing process. The holes should be clearly visible from the outside.


8. Thread the needle, twist and slightly unravel the thread about 50mm (2in) from the end, pass the point of the needle through the opened thread and draw the knot tight. This will secure the thread without making a large knot that could tear the paper.


9. From inside of the bookblock, push the needle through the center hole, leaving about 50mm (2in) of loose thread inside. Then from the outside of the bookblock, continue by pushing the needle through one of the other holes. Bring the needle out through the last hole and finally push it though the centre hole, taking care not to pierce the first thead.
10. Tighten any loops by pulling the thread parallel to the spine of the bookblock.
11. Once the needle has passed through the third hole, the needle end of the thread can be joined to the the loose end on the inside centre hole with a simple reef knot.


12. The ends should be trimmed off with 10mm (3/8in) to spare. With the point of a bonefolder, press the knot down into the center hole. This will help conceal the knot and prevent it from undoing. Remove the paper clips. At this stage the bookblock will be gaping so to reduce swelling place bookblock between wooden boards with a weight on top.

13. With the sewing completed the bookblock and endpapers can be trimmed. Start with the long edge (fore-edge). Flip through the pages to determine the unevenness of the edges. If the paper was folded neatly, only a small amount of trimming will be necessary. Determine the trimming point by eye and using a rule, draw a pencil line on the endpaper parallel with the spine, see below.
Align one side of a set square against the fore-edge and draw trimming lines at the head and tail of the bookblock making sure the corners are at right angles. Trimming must be carried out with a sharp knife and steel-edged safety rule.
CAUTION – Let the knife do the work – keep the blade vertical and don’t try to cut the book in one go; repeated light strokes will cut the bookblock more efficienty. ALWAYS USE A SAFETY RULE.


Trimming must be carried out with a sharp knife and steel-edged safety rule. It is only possible to cut thin books in this way and, even then, it will take several cuts with a knife to penetrate the layers of paper.
14. After trimming the edges, tidy-up the mull by cutting off the ends at an angle (5). The bookblock is now completed and can be put to one side while you make the case. To keep the bookblock as flat as possible place it under a heavy weight. Trim up the mull by cutting the ends off at a 45° angle


STAGE 2 – MAKING THE CASE

15. The first stag, making the bookblock, has been completed and it is now time to make the case. The purpose of the case is to protect the bookblock and make the book strong and durable. The second function of the case is to make the book an attractive object and this is where the choice of covering materials and careful workmanship play an important role. The boards are cut to size, making sure they overlap the edges of the bookblock to protect the edges of the paper. This overlap is known as the square.
The spine will be made from a piece of bookcloth and the boards will be covered in a patterned paper. Bookcloth is stronger than paper and that is why it is used to cover the spine where the book gets the most wear.
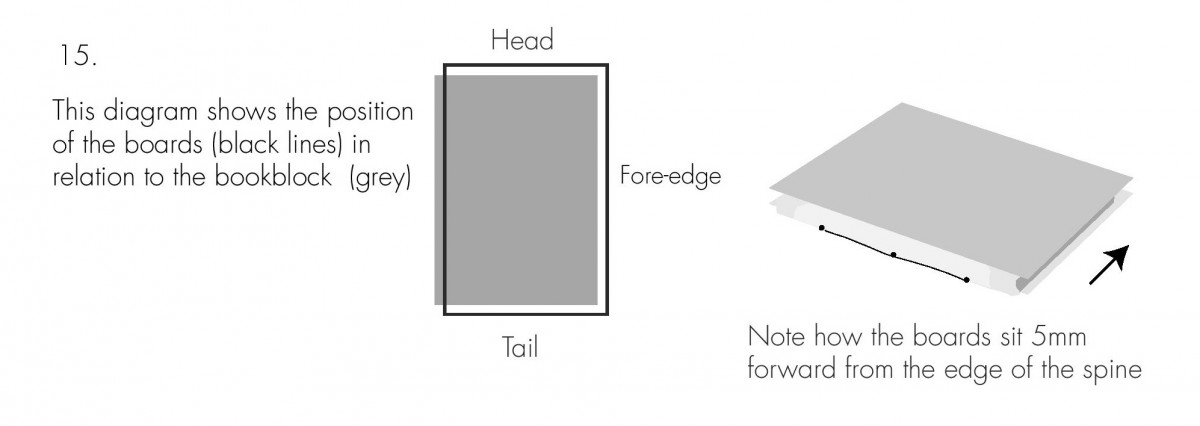


Cut the cover boards to size as shown in the diagram above. The cover boards must allow a 5mm (3/16in) square at head, tail and fore-edge, and an inset of 5mm at the spine to allow room for the hinge. Don’t forget to check the grain direction of the boards – the grain must run from head to tail. Boards can be cut by first measuring with a ruler or, alternatively, the cutting marks can be calculated by holding the bookblock against the board and marking off by eye. Use a set square to achieve accurate right angles.

16. Holding the bookblock and boards in position, take a scrap of cloth and wrap it around the spine. With a pencil, make two marks where the paper touches the edge of the boards. This will give you the measurement for the gap between the boards. The bookcloth will extend approximately 40mm (1½ in) over the boards so make two more marks to give the measurement for the width of cloth.

17. Cut a strip of board the width of the gap. This will act as a gauge and is particularly useful if you are making a number of books to the same size. With the grain direction running from head to tail cut the bookcloth to the width you measured with the strip of waste cloth (above). The length of the cloth must allow a 15mm (¾in) turn-in at head and tail.

NOTE – The distance by which the cloth overlaps the boards determines the final appearance of the book. The proportion of bookcloth to pattern paper is a visual judgement.
[wysija_form id=”1″]18. Using PVA mixed with some paste, glue out the cloth. Position the spine gauge in the centre. Lay the boards against the gauge, taking care to keep them level at the head and tail. At this stage, the glue should have enough slip to make any necessary adjustments. Remove the gauge.


19. Without disturbing the covers, carefully turn in the spine cloth where it overlaps at the head and tail and rub down with a bone folder. Take a little time to achieve good tight creases where it folds over at the boards and spine. Turn the assembly over so that the spine cloth is uppermost, rub down the spine cloth to remove any creases.

20. Cut out two sheets of pattern paper for the sides, with the grain direction running correctly, large enough to cover the rest of the boards and overlapping the edges by approximate 15mm (¾in). Glue out these paper covers, one sheet at a time, using a fresh sheet of waste paper underneath. Pitch each glued cover paper on to the boards taking care to keep the patterns running in the same direction. The paper should overlap the cloth by about 2mm (1/8in).

With the paper lying glued side uppermost (to counteract any curl) turn the edge furthest from the spine over to meet the cloth edge. When positioning the cover paper, take care to ensure that the edge runs parallel with the spine.
21. Before turning in the sides, cut the paper diagonally at least 2mm (1/16in) from the corners. Turn in the head and tail and pinch the corners in with the fingernails or bonefolder, before turning in the fore-edge.


22. When turning cloth or paper over the boards, carefully stretch the material tightly over the edges. If necessary, apply more glue to the edges of the cover paper before turning in. Finally, trim out the cloth and paper on the inside of the boards to give an even turn-in.
Stage 3 – Casing-in

23. The process of casing-in attaches the case to the bookblock and completes the binding. Lay the dried-out case flat on the table with the outside facing down. Position the bookblock on one of the cover boards, ensuring that the squares are correct.

24. Glue the endpaper underneath the mull. Then, working outwards to the edges, glue-out the whole endpaper. Great care must be taken not to get glue on the edges of the paper of the bookblock. Hold the bookblock in position and pull the cover board over to meet the glued paper. Immediately turn the book over and open up the other board.
TIP – To prevent glue getting on the edges of the bookblock, place a sheet of clean waste paper underneath the endpaper before gluing – but take care to remove it carefully before casing-in.

Hold the bookblock firmly in place and bring the cover over onto the glued surface. Immediately turn the assembly over and openup the board with the dry endpaper facing uppermost.

25. Keeping the glued board and endpaper flat against the surface, carefully lift the bookblock far enough to slip your hand in over the glued endpaper. If necessary, adjust the position of the endpaper by gently sliding it into position. The endpaper should lie square to the boards and once you are satisfied with its position rub the paper down with the tips of your fingers Take care to rub the paper down well into the spine.

Do not be tempted to lift the board too far back as this may stretch the paper and cause it to cockle and crease. Now turn the book over to case-in the other endpaper.
26. Glue out the second endpaper as before. Cut some silicone release paper (or greaseproof – cereal packet paper also works well), and insert between the inside boards and the free endpaper. This will stop any surplus glue from sticking where it should not and also help to prevent moisture from the boards penetrating the bookblock as it dries.
With a bone folder, or similar tool, gently find the cease where the board edge becomes the spine and run the tool along the edge to define the line of the hing.


The binding is now complete and should be left under a heavy weight to dry thoroughly.

Using the techniques learnt in this exercise, practise making a number of bindings in different materials. For example, instead of a quarter binding, try covering the case in full bookcloth.Experiment with binding larger books and get used to handling adhesives on a variety of materials before moving on to multi-section bindings.
Please Support us on Patreon!
![]() The minimum level of contribution is only $1 per month.
The minimum level of contribution is only $1 per month.
Moreover, starting with the pledge level of $3, you will get a digitized vintage book about bookbinding, book history, or book arts each month from us!
These pledges help iBookBinding to continue its work and bring more information about bookbinding and book arts to you!
