Simple Bookbinding Tutorial
tutorial, bookbinding, book binding, instructional 3 Comments
Today we will be learning how to make a nice book using Coptic Stitching.This book could be used for anything such as drawings, stories, poems, scrapbook, etc.
The Materials

- Ruler
- Glue
- Scissors
- Razor Blade (X-Acto Knife, etc.)
- Awl
- Embroidery Needle*
- Self-Healing Mat
- Paper (I used 8 sets of 5 sheets)
- Decorative Paper
- Board for Covers (shoe boxes work amazingly)
The Needle

You can use a regular embroidery needle, but it helps to have curved needle. I didn’t want go out and buy a curved one, so I put my regular one in the flame of a candle and bent it slightly. The bend comes in super handy later on when you sew the paper together.
The Covers
Cut tow boards 5 ¼” x 7 ¾” for the covers. Cut up the decorative paper to fit the cover and leave about ¾-1” extra on the edges.
Place the board on the paper with the decorative side down. Cut the corners to facilitate folding, and then glue the edges over the board. Do the same with the other cover.


The Paper
Cut the paper onto sheets 7 ½” x 10” (read more about the paper and cardboard grain direction here).
Fold the 5-page sets in half. These sets are called “signatures.” Professionals use a tool called a Bone Folder to strengthen the crease, but I’m too cheap to buy one (they’re only about $5). Instead, I’ve found that the bowl of a spoon is a cheaper and equally effective alternative.
With a pencil, make marks 1” apart on the edge of the cover, starting 7/8” down. Make corresponding marks on the edges of the signatures, starting ¾” down. (See above right).

Using the awl, punch holes on the marks you made 3/8” from the edge of the cover. Do the same on the other cover, and then punch holes in the signatures where you made the marks.
Then take a piece of thread roughly the height of the book times the number of signatures you’re using plus a little extra for knots and such. Now the sewing can begin!


The Sewing
Start by pulling the needle through the first hole of the first signature from the inside.
Bring the thread around the front of the cover and into the first hole (lost the picture, sorry!!).
Then bring it back into the first hole of the first Signature and tie a knot.


Sew the thread into the second hole of the signature, around the cover and into the second hole of the Cover, then back into the second hole of the signature, and follow suit all the way down.
At the end of the first signature, after pulling the thread through the last hole of the cover, instead of going back into the last hole of the first signature,sew the thread into the last hole of the second signature.
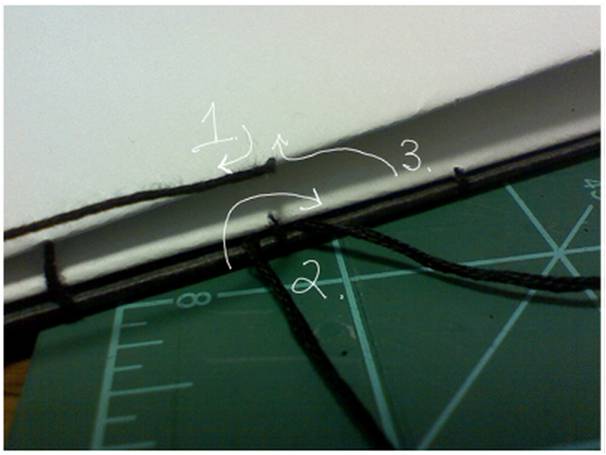
After coming out of the next hole of the second signature, pull the thread under the stitch connecting the first signature to the cover before going back into the same hole.


That’s why the curved needle is so handy!
At the end of the second signature, after looping the stitch connecting the cover and first signature, go into the first hole of the third signature, and follow steps as before, remembering to sew around the stitches connecting the first and second signature. (see pic) Follow suit until all signature are sewed in
At the end of the last signature, loop the thread around the back cover and sew down until finished Tie a knot and you’re done!!
Finished!

Approx. Time: 2 hours
Now you can add artwork, stitching or other embellishment on the cover, or you can go right into writing in it!
Thanks for reading! I hope you enjoyed, and I’d love to see what you make of this!
[support-website]Please Support us on Patreon!
![]() The minimum level of contribution is only $1 per month.
The minimum level of contribution is only $1 per month.
Moreover, starting with the pledge level of $3, you will get a digitized vintage book about bookbinding, book history, or book arts each month from us!
These pledges help iBookBinding to continue its work and bring more information about bookbinding and book arts to you!
