03. Fundamentals of Bookbinding
cutting, pressing, Beginning, Pasting, Easy, Novice 0 Comment
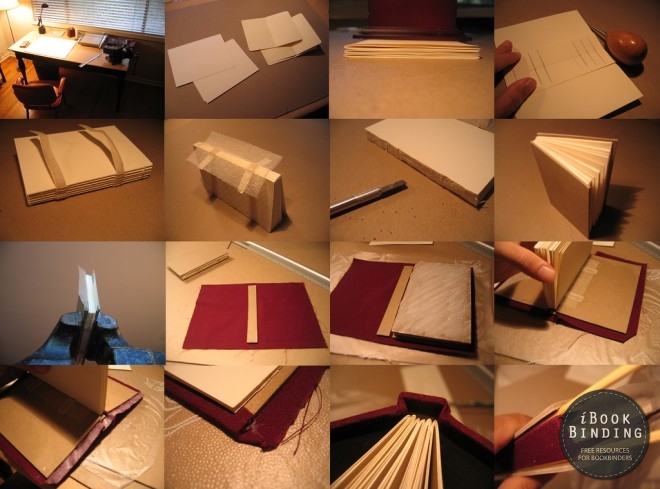
By now, you should have had all the material and equipment ready with you. The next step is to start with the fundamental techniques of bookbinding. In the simplest of handbook binding procedures, there are six main phases, which are demonstrated in figures 12 to 17.
Right now, they might seem really complicated to you, but delve into each stage separately, and you will find them to be extremely simple.
Taking a Quick Look at Each Individual Phase
Signature Preparation
Suppose that you have to bind a blank notebook. The first step is to cut paper sheets; make sure they are of an equal size, otherwise the final appearance will not be neat. Now divide the sheets into gatherings, each of which should have the same number of sheets. Fold the gatherings to form the signatures. As you fold each gathering, sign it or mark the page number onto the backside of the fold, hence the name signature. Now arrange all the signatures according to the marked numbers so that they are in proper sequence.
Sewing

The signatures have to be sewn together so that they maintain their assemblage and remain flexible as well. Sew them according to the tapes that run at the back of each signature as shown in figure 13. Ensure that you insert the thread through every fold so that the signatures are properly secured. Doing this will also allow you to turn every page easily when the book has been bounded.
Mull Attachment

In order to conceal the sewing thread and the stitches, a piece of cloth is glued to the back of the signatures as depicted in figure 14. Referred to as the mull, this also provides the book with a back support, and strengths the binding. Moreover, you will also need the mull to attach the signatures onto the boards.
Board Fixation

The next step is to attach boards onto both sides of the signatures so that they can be held flat, and the pages of the book remain protected. Cut boards a size that is slightly larger than the size of the pages on each open side. This will put the weight of the book on the boards rather than on the page edges. Figure 15 shows the manner in which boards are fixed onto the book. With this step done, most of the bookbinding process is completed. The next steps are just additional measures for protection and support.
Binding Cover

Cover the board with cloth or paper so that the boards can be protected and the sewn signatures can be concealed. Wrap your chosen material around the book, and turn it inside over the boards’ edges. See figure 16 for this.
Endsheets Arrangement

Endsheets is the name used for the first and the last pages that are attached on the inner side of the book onto the cover boards. This is done so that all taping, mull and the turned over edges of the cover material are hidden from view as depicted in figure 17. Once you do this, you would be over with the basic bookbinding procedure.
Now that you are aware of what is involved in a typical binding process, let’s move onto the process of accomplishing them.
Taking Measurements

A major prerequisite of bookbinding is measurement accuracy, and without it, your bindings will never have the end look that you require. It just does not matter whether you are cutting paper, the boards or the cloth; you have to be as precise as you can possibly be down to the fractions of an inch. Look at your steel ruler, and you would note that it has been calibrated in either tenths or sixteenths of an inch. On the other side, a metric unit would also be graduated. Use this as a reference, and make sure your measurements have a high level of accuracy.
If there is a measurement that does not fall on the graduations of your ruler, use a paper strip for the purpose. Mark the exact measurement with a sharp pointed pencil as shown in figure 18, and then use it for reference whenever a need arises.
[support-website]Cutting the Materials


Before you cut any material, square it up to the exact size. Use only your carpenter’s square for this because other squared items are often not a perfect square, even if they are manufactured in a facility. An example of this is the machine made paper. In order to cut your materials into a proper square, place your carpenter’s square onto it such that it touches an edge. This is shown in figure 19. Keep the square located in this exact position; you can hold it with one hand to ensure that it does not move about. With the other hand, cut the material along the other edge with an extremely sharp knife or scissors. If you are cutting paper, use a blade. Whichever cutting tool you use, keep it aligned with the edge of the carpenter’s square while you cut the material. Now move the material under the square and align it with the edge you just cut out. Make another cut against the edge. Continue in this same manner until you have cut all the four corners. Figure 20 demonstrates the way in which you should hold the square and the cutting tool.
Paper

Use a knife or a blade to cut paper. As a recommendation, cut only three to four paper sheets at a certain time. If you cut more than this in one attempt, the edges will not be cut properly and will be uneven, giving your book an untidy appearance. Moreover, it would be difficult for you to fold these edges properly, and your binding would not be of high quality. Also avoid making heavy cuts and getting the job done quickly. Proceed slowly and make small cuts, ensuring that the knife or blade is always aligned with the edges. Put light pressure on the tool, but hold the square firmly in its place.
If you are using patterned paper, cut it in such a manner that the pattern is parallel to the edge of the pages. Just in case you face any trouble in determining a suitable cut position, take help from a paper mask as shown in figure 21.
Board

A board can be cut with a knife. You can do this in the same manner which has been described above. But this time, place a high amount of pressure onto the carpenter’s square so that it does not slip from its original position. Even if it moves only a small distance, your edge is not going to be straight so make sure to keep it firm in its place at all times. Just like with paper, several small and light cuts will produce better results than two or three heavy cuts. True, heavy cuts can increase your speed, but the resulting edges will be wobbly and uneven because the knife often gets misaligned from the edge if you choose to cut this way.
Once you have cut the board into a proper size, round off the edges with 120 grit sandpaper. Hold the sandpaper on a wooden block and rub the corners and edges of the board against it as shown in figure 22. This is not exactly a necessity, but you would probably like to know that rounded edges help the materials maintain a stronger grip on the board when they are stuck on it. Moreover, rounded edges ensure the durability of both paper and the board for longer times, and prevent them from wearing off for prolonged periods.
Cloth
Cut cloth with a pair of the sharpest shears that you can find. You can do it with a knife and carpenter’s square as well. However, using shears is easier because more often than not, the cloth creeps from under the square, until you put extreme pressure on it. Most fabrics feature uniform weaving and when shears are used on these, the cut can just be made along a thread, resulting in cleaner cuts.
Just as with patterned paper, patterned cloth should also be cut such that the design is parallel to the edges. Once again, if you have any troubling in figuring out the direction, use sandpaper just like you did with paper.
Buckram can be cut just like paper even though it is actually a fabric material. Buckram does not move from beneath the square so this should be easy enough. Just ensure to trim the selvage edges prior to cutting buckram.
Pasting Things Together
Simple as it may sound, pasting requires extreme care and attention because it is a major differentiating characteristic between a high quality and poorly done binding. Before moving onto the actual method, there is one thing that must be mentioned. Always spread the paste in a thin and even coat over the materials. Just abiding by this is one single rule can take the quality of your work to another level.
If you apply uneven paste or apply it at certain positions only and not completely on the edges, the cloth will not lie down properly and air bubbles will be formed, creating wrinkles on the outer side.
Place all the things which you need to paste on a wastepaper. This has already been mentioned before, but once again, do not use newspapers as wastepaper because their ink can appear on your work. While you may not feel the ink on your fingers, it can still be transferred onto the paste brush, and from there, it can easily come in contact with all your materials, and completely spoil your binding.

Hold your material which you want to paste from the tip of your finger, but do it firmly. Take some paste onto your brush, and put it onto the centre of the material. Using an adequate level of pressure, spread out the paste towards the edges until the whole material is covered in a thin uniform coat as shown in figure 23. Make sure there are no lumps or streaks of any sort, otherwise the material will not be pasted properly. Also ensure that the paste has been completely applied onto the edges so that all the materials are stuck in a secure manner. Try not to get any paste onto your hand so that no smears appear anywhere.

When you have spread out the paste, carefully pick up the material and lay it on the surface to which you want to attach it. Now dispose of the wastepaper without getting your hands dirty. Cover your work with a clean rubbing sheet and rub a clean cloth over the sheet repeatedly to secure the grip of the pasted materials. Do this in strokes that start from the center and go onto the edges as demonstrated in figure 24. Rubbing the pasted materials in this way ensures that no air bubbles are formed and the surface remains wrinkle free. When you are done with this, discard the sheet, and use a fresh one for the next time. Be sure to a use a rubbing sheet because it will prevent stains from appearing on your work, and will also provide the materials a smooth surface to glide over.
You should complete pasting quickly before the paste starts to dry, but do no hurry with the process because the produced results would not be clean enough. So maintain speed that is in between. If you spread the paste slowly, it will just dry up and the materials would not be stuck together firmly, and if you do it hurriedly, the paper would probably get creased or wrinkled. Several practice sessions can help you in figuring out the speed you would need to maintain when pasting.

Keep in mind that when you paste a material, it expands. When you attach this to the board, the material starts shrinking back to its original size as the paste becomes dry. In the process, one side of the board is pulled along with the material and a warp is produced. Now if you paste a material onto the back of the board, another pull is exerted. The combined effect of both these pulls tends to bring the boards into their original condition. This process is shown in figure 25.
The problem is that the above mentioned process does not work as well as stated when you paste a thick fabric onto one end, and a light thin sheet onto the other end. Basically, the heavier the material you paste, the stronger will be the pull and the more pronounced will be the effect. So before you select any of the materials for the front and back of the bard, be sure to take this into consideration. As a suggestion, you could select materials with approximately the same weights.
If during pasting, you accidently apply paste onto a spot where it is not needed, you can try to clean it up with a cloth. Dampen one of the corners, and apply it onto the paste carefully. However, this technique will not always clean paste on every material. For instance, if you try to clean buckram this way, it gets dull. The surface of some paper also becomes rough when treated this way.
Every time that you sit down to past your work, be sure to try it out on a scrap paper first to ensure that your paste is working fine, and to build your speed level. Once you achieve acceptable results, start pasting together the actual materials.
Pressing the Binding

The last major process in bookbinding is pressing. After you have properly rubbed the pasted materials and ensured that there are no air bubbles or wrinkles, place it onto clean paper on a flat surface. Cover the surface with another sheet of paper once again as a protection and place a blank board or thick cardboard on it so that pressure can be distributed. Now put some weights on them, and leave them as they are until the paste becomes dry and the materials attach securely to each other. The time period which you give the binding to dry is particularly important for larger surface areas like cover board. Generally, you should do this for about 12 hours or so.
If you are using both books and brick for pressing, first place the bricks on your work and then the books. Use enough weights so that the total is at least twenty to thirty pounds. Greater weights result in better pressing and stronger binding. If your binding is finished, you can lay extra board pieces over the covers as shown in figure 26 so that the hinges are not crushed.
Just as it was stated in the beginning of this chapter, you would have realized by now that bookbinding is not difficult if you know what needs to be done. Practice the basics and when you develop proficiency with this, you can move onto the more advanced methods.
Please Support us on Patreon!
![]() The minimum level of contribution is only $1 per month.
The minimum level of contribution is only $1 per month.
Moreover, starting with the pledge level of $3, you will get a digitized vintage book about bookbinding, book history, or book arts each month from us!
These pledges help iBookBinding to continue its work and bring more information about bookbinding and book arts to you!
