10. Rebinding an Old Book Tutorial
tutorial, advanced, rebinding, intermediate 0 Comment
Got an old book that has its pages coming apart and its stitches loosening up? Well, take out your supplies, and follow the rebinding process in this chapter.

Inspect your book; whether it is a hardback or paperback, it can easily be rebounded if its signatures are folded and sewn. However, if the binding is perfect, implying that the signatures have been guillotine – trimmed on all four edges, it cannot be rebounded in the traditional way. This is because a perfect binding eliminates the folded edge of the signatures. Instead, an adhesive is applied on the back edges of the pages, which are unfolded sheets of paper, and these are forced into the spine of the book. Thus, all the pages are single leaves. Figure 176 shows an example of a perfectly bounded book. Though you cannot bind such a book with the general techniques that are available, you can still guard the individual pages and try to restore them as folded signatures.
Study figure 177; it illustrates a book with square binding whereas figure 178 shows a book with a rounded backbone. The former is good choice if there are a few signatures, and the book is thin, and the later should be the preferred binding method if the book comprises of several signatures and is thick. Too many signatures increase swelling because numerous threads lie between them to secure them and keep them in their place; rounded spines can hold this swelling, and so are more suitable. When a book is given a rounded back, a sort of shoulder forms on each side of the hinge, in which the cover boards can be fitted. Figure 179 illustrates this shoulder.


Let’s get down to the real task of rebinding now.
Detaching the Binding Components
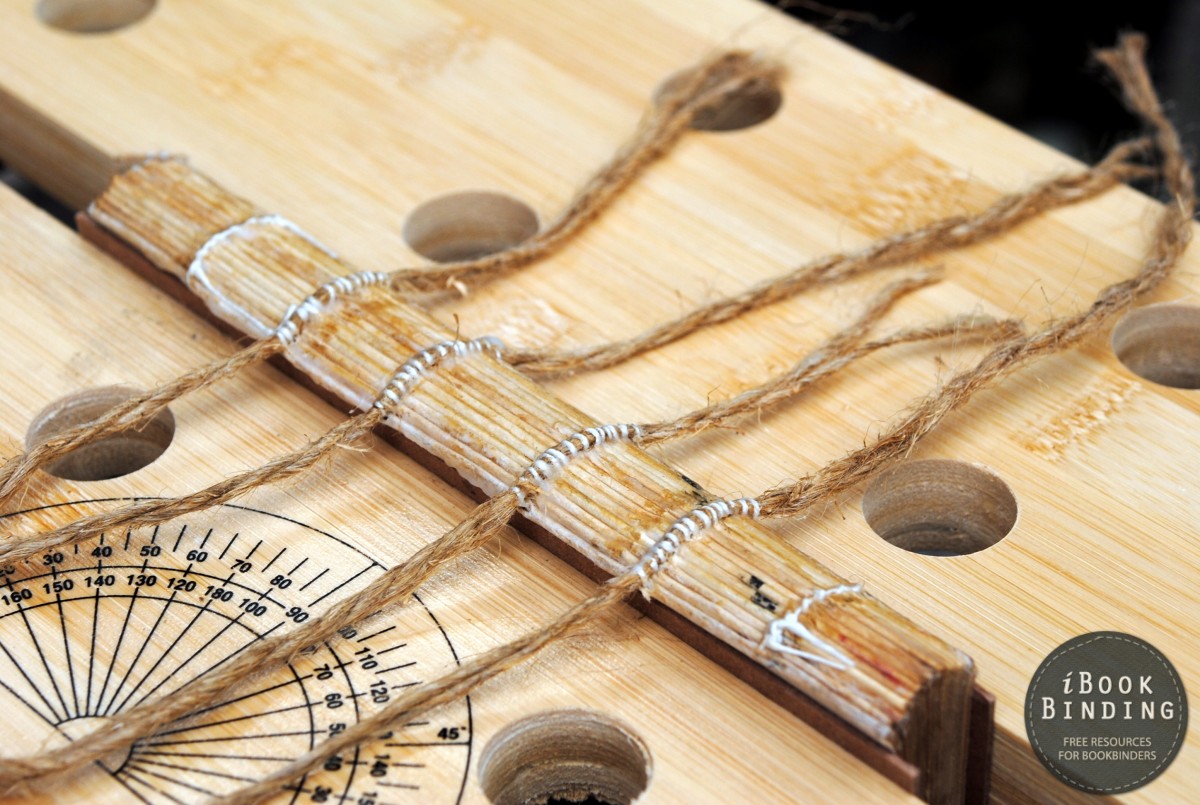
Remove all the binding components of the book, which include the mull, signatures and the cover. This process is more formally known as tearing apart. Place your book on a flat surface, and with a sharp knife, cut right through the endsheet, mull and the covering material as depicted in figure 180. While doing this, make sure that the blade does not reach the first signature. Now cut off the threads as shown in figure 181 and figure 182. Without exerting any pressure, carefully detach the lose threads form the signatures, and keep them aside.


As you continue to unthread the signatures, collate them as well. At times, a sequence is printed or bars are printed on their folded edges as shown in figure 183 so that they can easily be arranged sequentially.
A 24-minute video on how to repair the spine of a book by SUL Preservation
(worth a watch either before or after reading this tutorial)
Don't forget to subscribe to our YouTube channel to get access to HD videos of hundreds of Book Binding tutorials and reviews!
Flattening the Groove
In order for the new binding to be strong, try to flatten the signatures as much as possible, particularly at the edges. Press along the grooves shown in figure 184, and unbend the edges until the signatures become smooth. Take individual signatures and tap them with a hammer along the edge as illustrated in figure 185. Then place every signature separately under a clean board and leave weights onto it.


Repairing the Pages
Inspect each signature and if the pages have been severally damaged, repair them with guard strips and paper patches as you did for the music binding project in the previous chapter.
Sewing the Signatures

Place your signatures onto a piercing board, and form holes for sewing. Make sure to do this away from the previous holes, even if it means uneven spaces between the tapes and kettlestitches. Figure 186 shows an example. Tape up the signatures and sew them onto each other one by one.
As you proceed, you would notice a swelling emerging at the folded edge, particularly if the signatures are greater in number. This swelling has been illustrated in figure 187. Rounded back spines can take care of this pretty well; but a better idea is to deal with the swelling at this stage. Align up the signatures, and place a cardboard on them. Now knock the swelling with a hammer as shown in figure 188. Repeat the same procedure onto the other side, and keep doing it after you sew every three or four signatures. After you have hammered the folded edges of the signature you will need to pull the signature tapes to ensure it doesn’t get caught in between the individual signatures and to help tighten the threads. See figure 189 for more info.
Rounding and Hollowing the Back
Stack up the signatures in a sequential order onto a cover board, and mold their folded edges into a rounded shape, using your hands or a rounded surface. Figure 190 shows examples of different rounded edges; the moderate one is the most appropriate. Without modifying the back shape, place another cover board onto the top of the signature as shown in figure 191. Fix your work in the press.


Take a hammer and gently press the signatures so that a shoulder is formed along the hinge as shown in figure 192. Look at figure 193; the centre signature remains unbend whereas all other signatures have been slightly turned to allow a shoulder to form. Attach a board on the backbone, and paste the mull.
[support-website]With this done, you can continue binding the book with the general techniques. However, a new method of hollowing out the back is being introduced here. A hollow construction prevents the cover material from damage because the book can easily be opened up and closed without bending. The spine is made hollow by fitting a paper tube into it, which is attached to both the mull and the covering material.
Place your book in a press such that the spine faces you as shown in figure 194. Measure the thickness and cut out a paper strip that is three times wider than this value. The height of the paper strip should also be about an inch more than the book’s height. Fold the paper into a triangular shape such that each surface takes up one third of the total area. Mark the centre region as A, and the side regions as B and C. Apply paste onto the backbone, and place the A panel of the triangular paper onto it with the point facing upwards as demonstrated in figure 195. Rub the surface and place panel B onto panel A as shown in figure 196. Apply paste onto panel B, and attach panel C onto it as illustrated in figure 197.


Trim down the hollowed back along both edges as shown in figure 198 until it aligns with the cover boards. Attach the covering material, turn it inside across the edges, and paste it down.
This completes rebinding stage of your old book. In the next section we will look into attaching the cover boards.
Additional Resources
Please Support us on Patreon!
![]() The minimum level of contribution is only $1 per month.
The minimum level of contribution is only $1 per month.
Moreover, starting with the pledge level of $3, you will get a digitized vintage book about bookbinding, book history, or book arts each month from us!
These pledges help iBookBinding to continue its work and bring more information about bookbinding and book arts to you!
